Week 8: Motion Detection#
Laboratory 5
Last updated July 25, 2023
00. Content #
Mathematics
N/A
Programming Skills
Functions and Modules
Embedded Systems
Thonny and Micropython
0. Required Hardware #
Raspberry Pi Pico
Breadboard
USB connector
Camera (Arducam HM01B0)
8 Wires
Write your name and email below:
Name:
Email:
You should work in groups of 2-3 for this lab.
Write your groupmates' names below:
Groupmate(s):
import numpy as np
import matplotlib.pyplot as plt
import cv2
1. Background Subtraction #
There is a popular image processing technique called background subtraction. The most effective way to utilize background subtraction for motion detection is when:
the camera is stationary
the background is static
the lighting conditions do not change
there is minimal noise in the image
One scenario where all of these conditions are met is in production/manufacturing lines. In controlled indoor environments, long-term changes are rare.
Essentially, background subtraction allows for the separation of the background from the foreground in an image. For instance, if a camera is set up to monitor a doorway, most of the time, nothing is in motion within the frame. By selecting an initial reference frame, we can compare all subsequent frames to the reference frame.
vid = cv2.VideoCapture('test_vid.mov')
height = vid.get(cv2.CAP_PROP_FRAME_HEIGHT)
width  = vid.get(cv2.CAP_PROP_FRAME_WIDTH)
scale = 0.125                                           # smaller scale for faster computations
new_size = (int(width*scale),int(height*scale))
frames = []                                             # saving frames to a list so that you can try
                                                        # methods quickly without reloading the video
while vid.isOpened():
    success, frame = vid.read()
    if not success:
        print("Unable to read frame. Exiting ...")
        break
    frame = cv2.cvtColor(frame, cv2.COLOR_BGR2GRAY)
    frame = cv2.resize(frame,dsize=new_size)
    frames.append(frame)
    cv2.imshow('frame', frame)                          # display grayscaled video resized, no other alterations
    if cv2.waitKey(25) == ord('q'):                     # press Q on keyboard to stop
        break
vid.release()
cv2.destroyAllWindows()
Background subtraction refers to a whole class of methods. However, for the scope of this lab, we will only be using one specific method. To demonstrate an example, we will utilize the same test video from the previous lab. To keep things concise, we won’t delve into the detailed workings of cv2.createBackgroundSubtractorMOG2(). Generally, this method is slightly more robust against illumination changes. The output of the background subtraction function is known as a mask, which indicates that the output is a binary image. Pixel values in the mask are either 0 (representing the background) or 255 (representing the foreground).
Run the cell to observe the results!
fgbg = cv2.createBackgroundSubtractorMOG2(detectShadows=False)      # define this before looping through the frames

for f in frames:
    img = fgbg.apply(f)
    cv2.imshow('background subtracted frame',img)
    if cv2.waitKey(25) == ord('q'):                                 # press Q on keyboard to stop
        break
cv2.destroyAllWindows()
2. Motion Detection and Localization #
Exercise 1#
Suppose we apply background subtraction to each video frame and divide the frame into an \(M\times N\) grid, resulting in a total of \(MN\) blocks. Can you consider a (mathematical) rule to determine whether there is movement in a specific block?
Hint: Would the proportion of certain grayscale values be high or low when there is motion?
Write Answers for Exercise 1 Below
3. Connecting the Camera #
This time, we will record our own videos using the Arducam HM01B0, which is a small camera that can be connected to the Pico.
Wiring Instructions#
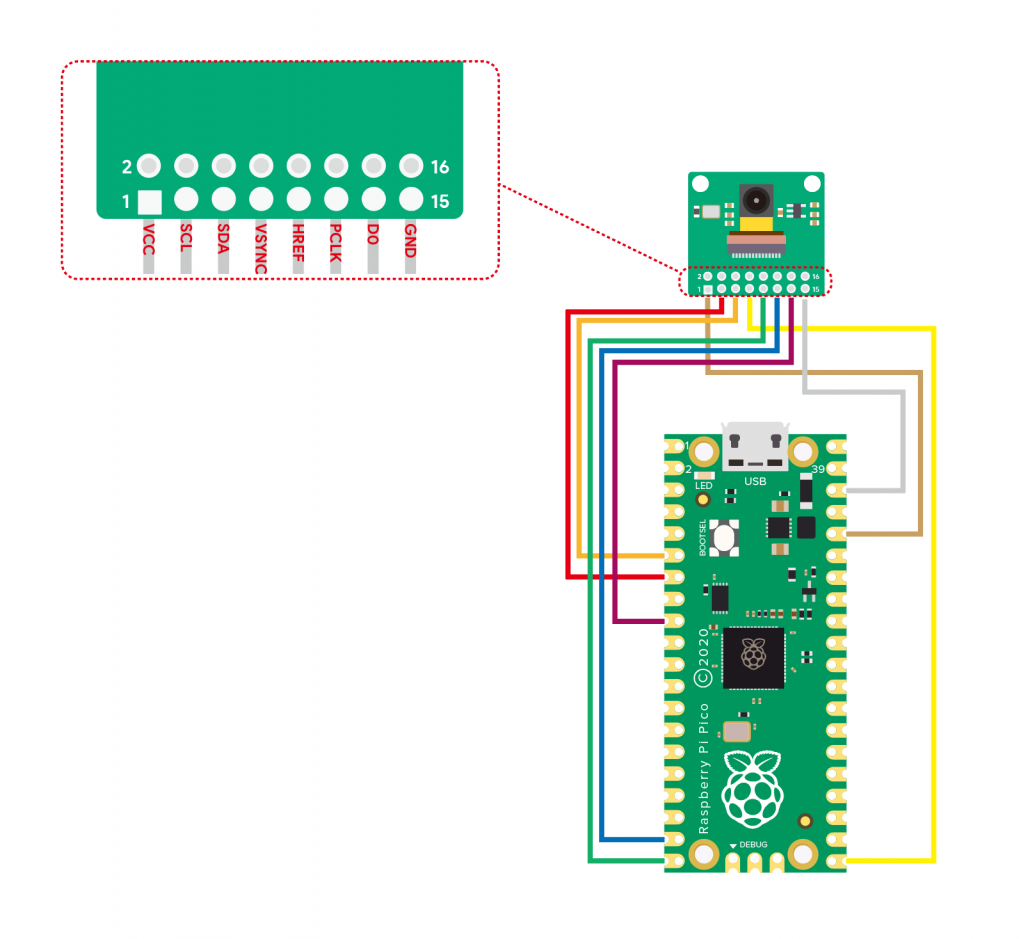
Please ensure that your microcontroller is not connected to the computer while you are wiring components together. If you are unsure about your wiring, please consult the instructor. Use your jumper wires to establish the following connections:
HM01B0 |
Pico |
|---|---|
VCC |
3V3 |
SCL |
GP5 |
SDA |
GP4 |
VSYNC |
GP16 |
HREF |
GP15 |
PCLK |
GP14 |
DO |
GP6 |
GND |
GND |
Here is an image of the completed breadboard:

To find the names of the pins on the Raspberry Pi Pico, you can refer to its pinout diagram located here or in the Extra Materials section. The HM01B0, on the other hand, should have its pins labeled.
After confirming that the wiring is correct, press and hold the BOOTSEL button on the Pico while plugging it in. Download the arducam.uf2 file and copy it onto the Pico’s drive using your computer’s file manager (it should be listed as an external drive: “RPI-RP2”) and not with Thonny. Once the file transfer is complete, the Pico will automatically disconnect, and its LED will start blinking rapidly.
Once the Pico has been successfully connected, please execute the following cell to ensure that we have successfully detected the Pico.
Exercise 2#
Using your camera, locate the area of motion in the video frame in real time (or near real time). You can employ any method to accomplish this, whether it involves background subtraction, your solution to the previous exercise, a combination of the two, or any other approach you can think of. Determine how to visually indicate the detected movement on the camera, such as printing a statement in Python or drawing a rectangle on the frame.
Display all the code you used in a cell below.
Note: If you encounter significant hardware issues, you can try applying your method to the test video instead.
Write Answers for Exercise 2 Below
Exercise 3#
Provide a description of how effectively the motion detector/locator works in a paragraph or two. What methods did your group try? What challenges arose, and were you able to resolve any of them?
Write Answers for Exercise 3 Below
Reflection #
Who would win in a fight? A billion lions or all the pokemon? Discuss with your group.
