Laboratory 0: Course Intro, Markdown, Latex#
Week 1
Last updated April 22, 2025
00. Content #
Mathematics
N/A
Programming Skills
REPL system
Editing code/Markdown boxes
Markdown
Latex
Embedded Systems
N/A
0. Required Hardware #
N/A
1. Before Starting #
Before really getting started with this course, navigate to the Brightspace and read through the Syllabus.
After this is completed, we will be setting up a file for organizational purposes that will be used to store all files throughout this course. To do this, navigate to the Home directory and add a new folder by right-clicking. Name the folder something that will be easy to find, such as “DSLab_Calc2.” If you’d like to put it at the top of the list of folders and make it even easier to find, add a tilde (~) at the beginning of the name you chose.
Save this and all other files going forward to this folder. It’ll make everything much easier to find and will especially come in handy when submitting the labs at the end of each class. This includes files that are downloaded through links during labs. When you click on a file link, it’ll send you to the GitHub page for that file. To download and save it to your folder, click on the button that says “Raw” on the top right of the file preview (unless it’s a PDF, then just click “Download”). This will take you to a white page with the information in black text. To see the file in the proper environment, right-click the screen and click “Save as…” and once you open it after this, it should appear in the correct environment!
Laboratory ethics#
“I pledge to behave ethically and with honesty in this course. I may discuss approaches for a solution with others, but my submitted lab report will be my own work, including all code. I will not make my finished reports available to other students, even after the semester is over. In particular, I will not post my labs on the Internet or make my files available to other people. I will not be a cheater.”
2. Introduction to IPython Notebook #
Welcome to the first of “The Data Science Labs on Differential and Integral Calculus!”
You are reading an interactive textbook. As you read the text, you will be asked to perform certain tasks and answer some questions. You will write your answers directly in this textbook. Keep reading to learn how to do this!
Two types of cells#
The application you are currently on is an IPython Notebook. The content of an IPython Notebook consists of two types of cells, “markdown” cells and “code” cells. Markdown cells are used to display nicely-formatted text for people to read. Code cells are used to display nicely-formatted code for people and computers to read. The words you are reading right now are part of a markdown cell. The gray cell below is a code cell. When you run the code cell, each line of code is executed in order. The output of the last line is shown under the cell. You can run these code cells by holding the “shift” key while pressing the “enter” key (shift-enter).
Some of these boxes are labeled as “Sandbox”. Feel free to use the sandboxes as a place to experiment with functions and see the capabilities of Python as you read about them, (and feel free to make your own code cells, which will be explained shortly). No code or text in the sandboxes will be graded. Here is an example. Try running it!
Sandbox
2+3+4
The markdown cells are actually transparent, so you will not really see them unless you go into “edit” mode, by double-clicking on the box. For example, the text you are currently reading is inside a markdown cell. Feel free to double-click on it to see what “edit” mode looks like. To go back to formatted text, press shift-enter while still in the cell.
While in edit mode, you will notice that the text is written in some coding language. The language is called “markdown.” Markdown allows one to format the text inside the cell, for example adding colors and controlling the font types. There are many good tutorials and cheat sheets for Markdown available on the Internet, for example this one . It may be confusing at first, but as you continue to use these formatting options, it’ll become easier and more natural.
Please continue by reading all the text boxes you encounter below, and running all the code boxes (shift-enter) as you encounter them.
If you are asked to answer a question, there will be a designated text box below a light blue highlighted cell for you to type in your answer. To begin typing, double-click the box to enter the edit mode. Type your answer using the Markdown language. When finished typing, type shift-enter; this will run your code or display your answer as formatted text, depending on the cell type.
Let’s try it out. Below is a markdown cell containing some Markdown code. Double-click on it and write your name and email in place of the one that is already there. Keep the code that makes the cell highlights in blue. When you are done editing the text, press shift-enter to see the result.
Write your name and email below:
First Name, Last Name, Email
A brief intro to markdown#
Since you will be turning in work throughout this class using these notebooks, not with pen and paper, it is important that you are able to communicate clearly using markdown cells.
Double-click this cell to see some of the useful Markdown formatting shown below
Numbered lists
Bulleted lists
Can also do indents
Italic text
Bold text
Italic and bold text
Code listings(use backticks(this), not inverted commas (‘not this’))
One of the most useful things about markdown is that we can use it to express mathematical formulas written using Latex. It is important that you are able to write formulas and equations so that they can be read on the computer.
2. Try it Out #
You can use the “plus” button in the top left corner of the document to insert a cell, or you can right-click a cell and click “Paste Cells Below,” if you want to copy a cell. Inside a cell, you can use the dropdown menu to the right of the plus button to switch it between being a code or markdown cell.
Try adding a markdown cell below and write a short message.
Along with adding a cell, you can also delete them by right-clicking the cell you want to delete and pressing “Delete Cells.” While you shouldn’t be using this capability much during this course, it is useful to know about.
Try deleting the cell below.
Delete me!
Exercise 1 (5 pts)#
Part 1 (2.5 pts)
The following code cell contains code but it is labeled as a markdown cell. Change it to a code cell and run it.
Write Answers for Exercise 1 Part 1 Below
sum([1, 2, 3, 4, 5])
Part 2 (2.5 pts)
Make a new markdown cell underneath this one. Write a sentence in it and execute the cell to make it format.
Write Answers for Exercise 1 Part 2 Below
3. A Very Brief Introduction to \(\LaTeX\) #
Latex (written stylized as \(\LaTeX\)) is a very popular, very old, very well-established tool for making typeset documents. The “x” should really be a letter chi, \(\chi\), which makes a “k” sound – Latex is pronounced “law-tek”, or “lay-tek”. Here are some common ways people use it:
writing submissions to academic journals
writing textbooks
preparing fiction books for publishing
writing assignments and exams for students
making slide presentations (like PowerPoint)
writing letters to their friends
Many mathematicians use Latex almost exclusively when preparing written documents. We are going to use only a tiny, tiny fraction of Latex in this course – the portion which prints formulas nicely. Many Markdown interpreters (including the one that comes with JupyterLab) know how to turn expressions written in Latex into nicely printed expressions. That’s how I can write a nice formula like
If you double-click on this cell of the document, you will see the characters which I typed to make that formula happen. Notice the $$ and $$ which are used to tell Markdown that a formula is happening.
Exercise 2 (5 pts)#
Copy and paste the formula from the cell above into the cell below. Change it so that instead of \(x\), the variable is \(y\).
Write Answers for Exercise 2 Below
One of the reasons Latex is so popular is that you can use the same formulas in different places, and they will show up differently based on context. If you want to put Latex in a line of text (without its own line) you can just put your code between dollar signs ($) like this: \(e^x = \sum_{n=0}^\infty \frac{x^n}{n!}.\) Notice that the sum is written smaller, so it doesn’t break up the text as much, but I used the exact same code.
Escape sequences#
A lot of the symbols we like to use in math are not on a typical keyboard. If you want a lower case sigma, you are usually out of luck. In Latex you can write a lower case sigma by writing \sigma, which shows up like \(\sigma\). Everything written after a backslash (the symbol \, which is found just under the backspace key on most keyboards) is not printed, but instead is treated like a command. In this case, the command is “put a letter sigma here”. To do a capital sigma, just type \Sigma with a capital S, like so \(\Sigma\).
Exercise 3 (5 pts)#
Write some Latex code in the cell below to produce an phi, psi, gamma, and delta, first in lower case then in upper case.
Write Answers for Exercise 3 Below
Subscripts, superscripts, and grouping#
It is really common in math to want to write a superscript like the 2 in \(x^2\) or the \(r\) in \(\varepsilon_r\). We do that with the ^ and _ keys (caret and underscore). Watch out: Latex is different from Python. In Python, we would write \(x^2\) as x**2. It can be easy to get mixed up when switching back and forth.
Here is another thing to watch out for: the subscript (or superscript) only works on the first thing after it. So, if I try to raise x to the 23rd power with just one caret (x^23) I get this: \(x^23\). No good! In order to fix this, we will tell the 2 and the 3 that they go together. We use the { and } symbols (braces) to group things together in Latex. I can type this instead as x^{23} which gives \(x^{23}\).
Exercise 4 (5 pts)#
The formula below is all wrong! Put in braces to make it correct.
Write Answers for Exercise 4 Below
Fractions and parentheses#
Fractions in Latex are a bit unusual in that they act on the two symbols which come after them. If I write \frac12 that makes \(\frac12\). Usually, fractions have more than one character in the numerator and denominator, so you will usually write a fraction with two pairs of braces, \frac{1}{2}. That is easier to read anyhow, I think. This makes it possible to more complicated fractions, or even fractions inside of fractions.
If you are in “text mode” (the smaller in-line text you get with $) the fractions are smaller, and if you are in “display mode” they are bigger. If you want to override that, you could use the command \tfrac which always does the smaller-style fraction, or the command \dfrac which always does the display style fraction.
When you have expressions involving fractions, they are often quite a bit taller than a single character. This can lead to ugly expressions:
We would prefer if the parentheses knew what was inside them, so they can get bigger. We can do that with the commands \left and \right, which turn normal parentheses into scaling parentheses.
Getting help#
Almost nobody knows every Latex command they use by heart. There are lots of ways to get help on the internet. One popular tool is Detexify which can help you find the escape sequence for a symbol you need. Try it out.
Exercise 5 (5 pts)#
Use Detexify to find the escape sequence for the symbol  , then type it using Latex below.
Write Answers for Exercise 5 Below
Another powerful way is to copy someone else’s working code. One great place to find it is on Wikipedia.
Exercise 6 (5 pts)#
You have not been told yet how to write a binomial coefficient in Latex. To figure it out, go to the Wikipedia page for the binomial theorem and find this formula:
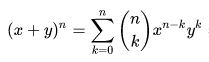
Go to “Edit” on Wikipedia and copy the Latex code you find there to reproduce the formula here below. Then, change the index of summation from a \(k\) to an \(i\).
Write Answers for Exercise 6 Below
4. Submitting Labs #
Now that you’ve finished the first lab, you’re probably wondering how to submit it. This was briefly explained in the Introduction, but here it’ll be explained a bit better.
First, make sure that everything is completely filled out and saved (either by typing Ctrl+S or by clicking the floppy disk icon in the top left of this application). Once you’ve done this, look at Brightspace for instructions on how to submit the lab.
Once you’ve done this, you’ve completed your first lab for this class!